Brewers' Wish List for Brewery Equipment
02/27/2019
By Rosannah Hayden
The holiday season typically finds home brewers and microbrewers preparing their favorite seasonal specialty beers and, as winter waxes on, reflecting on the past year’s brewing successes and failures. Brewers’ wish lists for brewery equipment reveal commonalities and variety in small-scale brewing approaches.
True to the age-old pattern of wintertime introspection, the closing months of the year provide an ideal time to take stock of one’s brewing operation and to make plans for system improvements and modification for the future. Although countless ways exist for improving any brewing operation, if you had the financial freedom to choose one piece of equipment that would help you up-scale your brewing setup, what would it be? BrewingTechniques posed this question to a number of its readers. From the responses of a diverse sampling of our audience (brewers of 50–500 gal/year on up to professional brewers producing 1000 bbl/year), we compiled a wish list, so to speak, that reveals the objects of brewers’ both fantastic and practical.
Brewpub owner Bill Owens (Buffalo Bill’s, Hayward, California) starts his list with a complete 50bbl brewhouse with a bottling and kegging system. “It would house a printing press and brewery and be located at the end of a road with peacocks wandering on the lawn. Friends and customers sit around picnic tables drinking imperial stout while people play bocce ball in the background.” On the other hand, if Ralph Olivieri, a home brewer from Seekonk, Massachusetts, were up-scaling his brewing operation, his money’s-no-object acquisition would be a complete brewing kitchen, “one with a sink, stove, scales, and a chiller for lagering.” Despite their differences, these imagined setups actually have more in common than they might first appear.
Although the wants and needs of a 75 gal/year home brewer differ common considerations — such as space limitations, equipment quality, planning, and the need for research before purchasing — remain relevant to all levels of beer production. When up-scaling, a timely investment in informationgathering and hardware investigation will pay off in spades, making both the beer and the brewing process more enjoyable.
Kettles That Fit the Bill
Not surprisingly, one of the commonly mentioned items on brewers’ wish lists was a
larger brew kettle. As home brewers become increasingly proficient and begin to act on the inevitable desire to experiment with new recipes and styles, that 16-qt boiling kettle purchased at the beginning of the brewing career suddenly starts to look small. Enter, stage left, one of the universal laws of brewing, applicable to operations of all sizes: production capacity is limited primarily by the size of the brew kettle. Although it is easy to add another carboy or fermenting vessel to the existing system to accommodate larger batches, it is the brew kettle capacity that determines a system’s production capacity.
As Don Gortemiller of Pacific Coast Brewing Company in Oakland, California, explains, “The bottom line is, bigger is better. Retrofitting and adding equipment is an expensive process, so it’s best to start with an oversize brew kettle and then worry about fermentors later. If you’re short on money, it’s wisest to invest in a large brew kettle and mash tun to allow for future expansion.”
Although Gortemiller’s comments were made in the context of increased capacity at Pacific Coast, which produces 500–600 bbl/year, they are equally relevant to brewers working on a smaller scale. Home brewers find that a small brew kettle confines them to small batches. Before purchasing a kettle, consider both present needs and future possibilities and buy accordingly.
In terms of quality and longevity, most experienced brewers consider stainless steel kettles (Figure 1) superior to ceramic-coated kettles. Ceramic pots are serviceable and relatively inexpensive, but the enamel coating on the inside of ceramic kettles can eventually chip or crack. Once the enamel coating chips, the underlying metal (iron) contacts the wort, which can produce off-flavors in the beer. Because of their susceptibility to chipping, it is important to reserve ceramic kettles for brewing only.
Although more spendy, stainless steel kettles are more versatile and can do double service for hefty stews as well as successful brews. And although the ceramic kettles can be purchased for as little as one-fourth the cost of an all-stainless one, you get what you pay for. A 15-gal, restaurant-grade, stainless steel kettle may require an initial outlay of $ 200, but after years of use it will likely be an heirloom you can bequeath to your grandchildren; if they grow up to be brewers, they’ll no doubt appreciate your farsightedness.
Restaurant chefs and experienced brewers know that a quality, thick-bottomed stainless steel pot retains and distributes heat most effectively and that the benefits of quality cookware far outweigh the initial costs. Look for a kettle constructed of at least 18-gauge steel with quality-welded or riveted handles and a well-fitted lid. Kettles of varying sizes can be obtained through mail-order catalogs, homebrew supply stores, and restaurant supply houses.
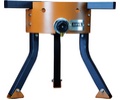
Propane Burners
Home brewers, especially those using larger brew kettles, are well familiar with the trials and tribulations of brewing on the stove; uneven heating, difficult cleanup from boil-overs, interminably long times to boil, and even spousal pressure are among the multiple forces that spark many brewers’ desires for a propane burner.
One of the more popular items on our readers’ wish lists,
a portable propane- or natural gas-fueled stove provides heating qualities that reduce preparation time and increase the likelihood of success. Paddy Giffin, a home brewer and employee at The Beverage People (Santa Rosa, California), currently produces 150 gal/year, of which about 75% is ale and about 25% lager. When asked about his greatest wish for brewing equipment, he described
a three-tiered system with a 10-gal capacity to facilitate experimentation with yeast cultures (separating the batch into separate vessels for pitching with different yeasts). Short of a completely new system, however, a propane burner is highest on his list of equipment to be purchased when economically feasible.
Propane burners are available from a number of manufacturers for reasonable prices, and it’s a purchase that can be easily rationalized in light of the burners’ durability and time-saving properties. Propane burners range in price from around $ 35 for the cheaper models to $ 110 for high-end versions. Outputs range from 80,000 to 2000,000 Btus. Generally speaking, the higher the Btu rating, the higher the heat output and the shorter the time to boil. The Beer Cooker — a 200,000-Btu model with a swingin-place baffle, adjustable brass needle valve, regulator, hose, and adapter — is available by mail order through Brewer’s Resource (Woodland Hills, California) for under $ 50, and for most home brewers this model is entirely sufficient. Designed for outdoor use, the burner (also available in a natural-gas version) will bring 10 gal of liquid to boil in ~20 min.
What’s at the top of your wish list?
Bill Owens, brewpub owner: A 50-bbl brewhouse with a bottling and kegging system. “It would house a printing press and brewery and be located at the end of a road with peacocks wandering on the lawn. Friends and customers sit around picnic tables drinking imperial stout while people play bocce ball in the background” — dressed in white, of course.
Ralph Olivieri, home brewer: A complete brewing kitchen, “one with a sink, stove, scales, and a chiller for lagering.”
Dale Dean, home brewer: A “custom-made, ½-bbl, stainless steel, gravity-feed brewing system with a propane burner.” Barring this, he’d like “either a top-loader freezer (for easier lagering) with an internal thermostat, or else a counterflow wort chiller.”
Don Barkley, microbrewery master brewer: “Coincidentally, we’re in the process of upscaling our brewery. We’re adding fermentation vessels to increase our batch production for 22 bbl to 50 bbl. We’ll continue producing our bottle-conditioned ale, but the increased fermentation capacity will allow us to expand into other kinds of beer, such as lagers.”
Paddy Giffin, home brewer: A three-tiered system with a 10-gal capacity to facilitate increased experimentation with yeast cultures.
Teri Fahrendorf, brewpub brewmaster: “A mash tun with a sloping floor so that leftover water and grain won’t pool on the bottom of the tun after cleaning. Our current mash tun has a flat floor with two drain ports on the bottom of the tank. The weight of the mash causes the tun floor to bow slightly, and residual water and grain bits tend to remain in this concave area between the drains. It’s very hard to get the unit completely clean, and any remaining grains can sour the next batch, so a slope-floor mash tun would be a real improvement.”
For the most part, differences in price between various models are based on differences in construction. Cheaper models can be noisy, emitting a loud, sputtering hiss from the burner. The metal on the less-expensive models tends to be lighter and thinner, which affects stability and durability. The burners are smaller on such models, and the plate design is usually simpler as well. Even models that outwardly appear sturdy, such as cast-iron burners, can be problematic. One brewer noted that a cheap cast-iron burner that he used developed noticeable cracks in the iron, presumably due to lack of resilience to high temperatures. Appearances can deceive. The variables in burner design also influence the rate of boil and the evenness of heat distribution, so it’s important to remember the desirability of a well-researched initial investment.
Another important consideration to make before buying a burner is the design of the base. Propane burners generally are available in three-legged and four-legged models; more legs, however, does not necessarily mean more stability. On a perfectly even surface, four legs are better than three, but on an uneven surface, a three-legged base is less likely to tip over. Because most outdoor surfaces are less than perfectly even and level, a three-legged base would, in many cases, be the most stable. Nevertheless, the most important aspect of a base is its width and center of gravity. Keep in mind that if you have a 10-gal wort-filled kettle resting on the burner, you are balancing over 80 lb of scalding hot trouble. A tippy, wobbly burner can lead to disaster, so look for a model with both a low center of gravity and a wide leg base.
Kegging and Refrigeration Systems
Alison Calandra, a beer and wine retailer and avid home brewer in Eugene, Oregon, aspires to someday get out of bottling and into kegging her beer. She brews about 250 gal/year, and the time-saving aspects of a keg system (only one container to wash, sanitize, fill, and seal), and its versatility (keg dispensers can do double duty as lagering or conditioning tanks) are among her reasons for putting a draft beer system at the top of her wish list. “I save all the Grolsch bottles that my customers return for deposit, and I use those for easier bottling, but I’d really like to have a keg system.”
Not everyone is as lucky as Calandra, whose business affords her access to a large cooler. Although many retail home-brew suppliers sell complete keg systems and system components, refrigeration units are sold separately. The exception to this would be an integral refrigeration-cabinet draft system, which can sell for over $ 1000. One such unit is the BeverageAir, a complete keg-and-cabinet set (24 in. deep, 37 in. high), which includes a carbon dioxide tank and keg. The set sells for about $ 1100 and is available through many homebrew supply stores. Nevertheless, with some ingenuity and patience, a relatively inexpensive system can be assembled for about S350. A complete draft system consisting of a new 5-gal stainless steel keg, carbon dioxide tank, dual-gauge gas regulator, and the necessary hoses and fittings can be purchased for about $ 230 through brewing suppliers, and a used refrigerator can cost as little as $ 30, depending on where you buy it. Classified ads are a good place to find an inexpensive unit that will suit your system needs.
Jon Hoyt, a home brewer from Oakland, California, designed and assembled his draft system piece by piece. Hoyt shows what you can make with under $ 200 and only a modicum of mechanical knowledge and tools: a complete, fully functional draft beer/refrigeration unit.
“I bought a used 5-ft-tall fridge for $ 35 and it works great. It’s got a freezer unit where we store hops to keep them fresh. I got a CO2 dispenser at a fire extinguisher store for $ 15 and had it filled, which cost another $ 10. I picked up a used 5-gal keg for 50 bucks, then went to a restaurant supply store, where I bought a regulator, pressure hose, fittings, a tap, and a shank, all for around $ 85. Next, I drilled a hole in both the door and the side wall of the refrigerator and attached the tap and the shank to the door of the unit. The CO2 tank and regulator is set up next to the fridge, and a hose passes from the tank through the side hole and into the keg inside. We use a Styrofoam tray (the kind that supermarket meat is packaged in) that we saved to catch the drips from the tap. The whole system works great, although the freezer ices up a little.”
Wort Chillers
Dale Dean of Green Bay, Wisconsin, responded to our queries about his dream acquisition by describing a “complete, custom-made, ½-bbl, stainless steel, gravity-feed brewing system with a propane burner.” Barring this, he’d like “either a top-loader freezer for easier lagering with an internal thermostat [he currently uses a refrigerator with digital temperature control], or else a counterflow wort chiller.” Dean knows that reducing the time between chilling the wort and pitching the yeast minimizes the chance of a bacterial infection and ensures a good cold break.
Dean currently uses an open immersion chiller, but he’d like to switch to a closed system to decrease the possibility of infection. Although immersion wort chillers can be placed in boiling water or directly into the boiling wort to sterilize them before use, Dean’s concerns about introducing foreign agents into his wort are well understood and well founded. Anything a brewer can do to lower the possibility of infection should be done whenever possible, and a counterflow system is one way of reducing the risks. Whereas an immersion chiller cools the wort by flowing cold water through a copper coil immersed directly into the wort, counter-flow chillers work by running hot wort through a narrowbore tube from one vessel to another while cold water runs in the opposite direction through a widerbore tube that jackets the inner wort-filled tube. Both immersion and counterflow chillers require careful and complete sanitizing immediately before use. Immersion chillers have more surface area to sanitize and tend to chill wort somewhat unevenly (even cooling requires swishing the immersion coil around inside the vessel), and these limitations make a counterflow system an attractive item.
Counterflow chillers reduce the wort’s exposure to airborne contaminants, and some models can chill wort in a very short time. One model that stands out in terms of quality and design is the Stoelting Counter-Flow Wort Chiller (Stoelting, Inc., Kiel, Wisconsin). Using a flow rate of 0.33 gal/min., this model reportedly can chill 5 gal of wort from 210 °F (99 °C) to 65 °F (18 °C) in 15 min. Most immersion chillers take about 35–45 min, and achieving even cooling requires swishing the immersion coil around inside the wort vessel. The Stoelting chiller is constructed of a stainless steel wort line wrapped with a finned copper tube (Figure 2); the stainless steel tube provides a sanitary environment for the wort, and the highly conductive finned copper sheath is designed to maximize heat transfer. The wort tube is centered inside a ¾-in. cold-water copper line. The chiller is 8½ in. high and 11¼ in. wide, and an optional stainless steel housing unit is also available.
One of the more innovative and compact chiller designs, the B.I.T.O.A. wort-chiller (Brewers’ Warehouse, Seattle, Washington), is an interesting counterflow chiller that, according to the manufacturer’s specifications, can cool 5 gal of wort from 212 °F(100 °C) to 70 °F(21 °C) in 12–15 min, using 65 °F (18 °C) tap water. The wort siphons through a coiled copper tube housed inside a PVC canister mounted on a stand. The unit is 15 in. long and 4 in. wide. Space often being a dear commodity for brewers, this chiller offers an efficient, moderately priced alternative to immersion chillers.
Exemplary Innovation
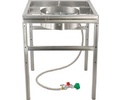
One reader, Randall Boyd of Modesto, California, constructed a homemade brewing system that is a shining example of ingenuity and resourcefulness. Like almost every brewer, however, he still harbors unrequited equipment desires. First, lets look at his present system.
In addition to teaching all-grain brewing classes at his local home-brew supply store, Boyd regularly brews 10-gal batches in his homemade, three-vessel, gravity-feed system. After acquiring two inexpensive Budweiser kegs ($15 apiece, used) from a retailer and a friend, and one keg for which he traded a batch of homebrew, he proceeded to enlist the help of a machinist friend, who cut the tops off two of the kegs with an acetylene torch. His buddy wasn’t around when he acquired the third keg, and as Boyd recalls, “I used a saber saw to cut the top off of the keg because I wanted to use it right then; I wore out a few blades in the process, but it worked!”
Boyd then purchased three ball-type spigots at a local hardware store ($15 apiece) and had his friend weld a threaded pipe onto the faucets and then welded these onto the tanks. Next, they modified a perforated stainless steel screen (salvaged from used cannery equipment) into a false bottom for the mash kettle to round out his all-grain brewing system.
The next step involved building a series of platforms for his gravity-feed system. The sparge water kettle sits on a 7-ft platform, the mash tun at 5 ft, and the boiling vessel at 2 ft off the ground, from which the wort can be fed into a fermenting vessel.
Next, he built a 4 X 4 superinsulated room. “I used 2-in. foam insulation on the walls, floor, and ceiling and placed an air conditioner inside. The temperature is maintained at 65–70 °F by a remotecontrolled thermostat that plugs into a wall outlet. This system allows me to make ales in the summertime without letting high temperatures make the ale too freaky.”
Cornelius kegs, kept chilled in a converted fridge purchased from a friend, round out his system. Boyd’s setup shows what can be done for a nominal price (less than $ 100), with a little motivation and know-how. Of course, it helps to have friends with tools, mechanical ability, and similar interests in brewing.
Grain Mills
For Boyd, the only gaps in his system exist in the stages directly before and after brewing. He wants to someday add a grain mill and a filter to complete his setup. Grains age and lose flavor rapidly when exposed to air; crushing the malt just before brewing gives a fresh, robust grain flavor unavailable in precrushed malt.
Grain mills are available in a range of styles, sizes, and prices. The tin-plated cast iron Corona mill (Landers Y CIA., S.A., Medellin, Columbia) is a durable, serviceable, inexpensive mill (sold in many homebrew supply shops for around $ 40). Flat metal plates supply the grinding action, and a tall hopper holds over 1 lb of grain. The Corona can be motorized by attaching a drill adapter bolt, which makes the mill suitable for preparing large quantities of grain for mashing. A nicely constructed basic mill, the Corona is ideal for budget-bound brewers looking for freshly ground grains.
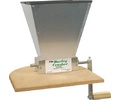
Brewers being the innovative, tinkering types that they are, it’s no surprise that modified and improved grain mill designs are available in many retail outlets. One such revamped model is the PhilMill (Listermann Mfg. Co., Norwood, Ohio), available through homebrew suppliers for $ 70 – $ 80. The PhilMill, designed by home brewer Phil Listermann, is a very compact, hand-cranked single roll mill that clamps onto a table or bench (it can be easily motorized in much the same way as the Corona). The grain, husks intact and with minimal flour, discharges over the edge of the table and into the brewer’s bucket. The brewer feeds the hopper which, consists of a plastic 2–L soda bottle (larger hoppers can be attached for high-volume grinds). The PhilMill is a distinctive, moderately priced mill of relatively lightweight and compact construction.
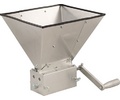
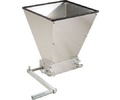
Another type of grain mill suitable for home brewing is the roller-style mill. One such model, the MaltMill (Jack Schmidling Productions, Chicago, Illinois), consists of a large plastic hopper, a hand crank, and two 10-in. counter-rotating rollers, which crush the grain while doing relatively little damage to the husk. The MaltMill fits on top of a standard 5-gal plastic bucket, into which the grain falls. The width of the rollers allows a large volume of grain to be crushed at one time. Priced at around $100, this mill offers brewers a quality mill at a quality price.
When it comes to mills, each brewer’s space limitations, personal taste, brewery setup, and economics will guide the choice of a grain mill. Regardless of the brand of mill chosen, the satisfaction of enhanced grain flavor and freshness make this item a worthwhile purchase.
Filters
Filters are useful for removing chill haze and particulate matter from finished beer. Whether a microbrewery uses a diatomaceous earth filter or a plate-and-frame sheet filter, the main purpose of filtering is to make the beer yeast-free and to remove the proteins that cause chill haze.
Filtering, however, is a complex and sometimes difficult process, especially if sterile beer is desired. Filtering out bacteria, for instance, requires a 0.2-µm filter; besides taking a long time, using such a fine filter will remove some of the large flavor molecules, undoubtedly altering the body and character of the beer. Filtering for yeast, on the other hand, requires a coarser filter that allows more flavor and texture to remain in the beer. The question, therefore, is “What do I want to filter out, and what type and size of filter suits that purpose?
Striving for brewing excellence: Expert advice on system improvements
Would that all home brewers and microbrewers had Michael Lewis’s good fortune. Through his line of work, Lewis, brewer and brewing sciences professor at the University of California, Davis, has access to all the precision brewing equipment he requires. When questioned about his equipment desires, Lewis offered this unselfish request: “My wish, or what I would like to see, is increased attention to quality control on the part of home brewers and microbrewers. Routine quality control methodologies and equipment are sorely lacking throughout the trade, and product consistency suffers as a result.”
Lewis points out that such simple pieces of equipment as temperature control devices, a pressure cooker and wire loop for sterilizing purposes, and quality hydrometers are often overlooked or underused by novices and experienced brewers alike.
According to Lewis, the lack of concern for data and precision isn’t limited to home brewers. “Brewpubs and home brewers don’t maintain records to the extent they could. Calculating and recording the beer’s gravity, foam, color, pH, and so forth is relatively simple and should be a regular part of the brewing process.”
Lewis’s comments emphasize the importance of consistency in brewing; just as following a recipe and set procedure facilitates a repeatable result, the objective data afforded by recordkeeping helps brewers compare and improve their beers over time.
For home brewers interested in precision brewing methods, Lewis offers several recommendations. “Useful tools for upgrading include a programmable temperature control device for maintaining proper mash temperatures; a counterflow wort chiller and large stainless steel or copper kettles. My advice to home brewers is for them to get out of fermenting in plastic buckets and into glass carboys. Although plastic is a good, cheap way to get started, if you find that you enjoy brewing, you should try to progressively upgrade your system and equipment. Try to get into draft; don’t bottle unless you have to.”
Although many people associate brewing system improvements with prohibitively expensive equipment price tags, Lewis suggests that, although some pieces of equipment certainly will better one’s brewing system, a superior and more predictable product can be had simply by improving sanitation and maintaining accurate records when brewing. Says Lewis, “Brewers need to make a bigger commitment to quality; doing this requires an investment in both hardware and knowledge.”
Home brewers who have problems with chill haze (which sizes in at 0.4 µm) can use a 0.5-µm filter by chilling the beer to almost freezing so that the proteins that cause chill haze coagulate. A 0.5-µm filter will then remove these “clumps” of protein, leaving haze-free beer. Nevertheless, according to Pat Cappon, a sales representative at The Filter Store, filtering changes the body of a beer; a filter is most useful for those producing light ales rather than dense, dark beers. Heavy, dark beers can be filtered, but they are difficult and sensitive to filter and require a coarse filter grade to work properly.
At the microbrewery level, filters are useful not only for clarifying beer, but also for increasing shelf life and production (mechanical filtering is quicker than gravity settling). Shelf life is of greatest concern to microbrewers who market their beers in bottles and kegs distributed to retailers.
For a small brewpub where all beer produced is consumed on premises, a filter is, from most standpoints, probably unnecessary and even unlikely to be cost-effective. Don Gortemiller of Pacific Coast Brewery explains, “If we had a bottle packaging arrangement, we’d look at a filter; as it is, we get by very well using good yeast, which really reduces problems with turbidity. We tine our beer with isinglass or Irish moss, and it comes out pretty clear. For starters, a filter would cost us around $ 6000; with the cost of replacing the filter medium ($ 10–20 per 7-bbl batch), combined with the keg or so of beer lost to the filter each batch, it’s just not cost-effective for a small brewery like ours to filter our product. As it is, we sell every bit of beer we brew each month, so storage isn’t an issue.”
Gortemiller’s wish list centers on increased space and production capacity. “If money were no object, I would like to have a spacious single-story structure with a gas-fired brew kettle [Pacific Coast currently brews in the basement, with the pub located on the first floor looking out onto historic downtown Oakland). Also, I’d like to brew using all-grains instead of malt extract.” Filters are an expensive brewery component (small filters start at around $ 6000, and large filters cost more than $ 25,000), and the question of whether or not to filter depends on the particular needs of the pub or microbrewery.
Home brewers may purchase a fairly inexpensive yet effective filter capable of removing not only yeast sediment, but chill haze and even bacteria as well. One such filter is The Kit (The Filter Store, Rochester, New York), a canister-style filter designed for use with a two-keg system. Although The Kit can be used with a bottling system, a pump is necessary to propel the beer through the filtration unit; this system is not designed for gravity filtering.
Perhaps an ideal application of this product is to use the carbon dioxide in keg #1 to force the beer through a tube into the filter, where an exit hose attached to keg #2 carries the filtered product into your serving keg. Compared with larger filters, such as those that microbreweries use, a small canisterstyle unit will not adversely affect batch yield. There is nominal loss in the process; the pleated, polypropylene filter housed inside a PVC canister traps only the yeast, proteins, and other fine particles. The Kit costs about $ 75, and replacement filters run about $ 33 each. It can filter about 5 gal of beer before needing to be flushed with a reverse flow of clean water; each filter will filter about 250 gal before requiring replacement. The 0.5-µm filter reportedly performs at 99.9% efficiency; filtration time for a 5-gal batch of beer is 20–40 min.
Research, Research, Research
Research before purchasing is important for almost any upgrading purchase you make for your brewing system. Teri Fahrendorf of the Steelhead Brewery in Eugene, Oregon, advises home brewers to talk to other brewers about their experiences using a particular system or piece of equipment before making any investments themselves.
“For home brewers looking at modifying or up-scaling their brewing operations,” says Fahrendorf, “one of the best things to do is to go down to your local homebrew supply store and get information on the local brewing club’s meeting dates and members. Get involved early on with experienced brewers by joining a brew club; where else can you sit around drinking good beer and talking about your brewing interests? If you want to try all-grain brewing, ask someone with mashing experience if you can watch them brew with grains a few times. Before you invest, see if it’s something you really want to get into or whether it’s just something you want to play with. …” Sound advice from an active brew club member.
Whether you’re fantasizing about purchases large or small, remember that much information is available, and many people with considerable knowledge are ready and willing to assist you in the process of actualizing your dreams of an ideal brewing system.
Related Products
All contents copyright 2024 by MoreFlavor Inc. All rights reserved. No part of this document or the related files may be reproduced or transmitted in any form, by any means (electronic, photocopying, recording, or otherwise) without the prior written permission of the publisher.


.png)
.png)
(1).png)
.png)